The Philippines, the archipelago country with its gorgeous beaches, rich culture and the global-reputed hospitality, receives millions of visitors annually. To the modern day traveler the days of paperwork that was completed on the plane are a blessing that is wearing out. The Philippines has also gone digital in entry and this has been through a streamlined system which has made the process faster at key ports such as the Ninoy Aquino International Airport (NAIA) in Manila.

The terminology is however confusing. Although not every nationality can receive a true Philippines electronic visa (e-Visa), all passengers entering the country have to fill in the required digital E-Arrival Card which is the largest determinant of the speed at which you clear the immigration desks in the usually congested terminals of NAIA.
This detailed guide will make you follow the required digital procedure, the hardcopy documents you need to prepare and the last procedure at the NAIA immigration counter to ensure that your Philippine adventure begins with efficiency rather than waits.
1. Demystifying the Philippine Digital Entry: E-Visa vs. E- Arrival Card
The initial move to make upon entry into the Philippines is to have knowledge of which digital tool fits in you. This is the pitfall most new entrants commit by confusing these two different requirements.
A. The Formal Philippines e-Visa.
It is a particular electronic document that is issued to the citizens of several countries (most prominently China and India) who need a visa to enter the Philippines. In case you belong to one of such countries, then you need to fill the other Philippines e- visa application via the department of foreign affairs (DFA) site, which involves a lot of paper work and security inspections.

B. Universal Requirement: The Mandatory E-Arrival Card
Whether you are visa-exempt (e.g. US, UK, Canada, Australia) or you have to apply to the formal e-Visa, all individual international arrivals are obliged to fill in E-Arrival Card.
- What it is: The E-Arrival Card is a free and compulsory electronic health and border control declaration, which has replaced the old paper-based Health Declaration Card (HDC).
- When to fill it out: You can enroll and fill your E-Arrival Card to not exceed 72 hours prior to arrival in Philippines. One cannot submit it before this window.
- Why it Matters: The resultant QR code is scanned by health and immigration officers at NAIA, and this immediately connects your personal and flight information to the government system. In the absence of this QR code, your processing will be slowed down, since you will be taken to a different processing location.
2. Step-by-Step Guide to Completing the E-Arrival Card
The process is fast, provided you have all your details handy. It should be completed on the Philippines Visa on Arrival application form online.

Step 1: Provide Personal and Travel Information
This section gathers basic data, ensuring accuracy is paramount:
- Flight Details: You must know your exact NAIA Terminal of arrival (NAIA has four terminals: 1, 2, 3, and 4), your specific airline, and your flight number.
- Passport Information: Enter your full name exactly as it appears on your passport, date of birth, and nationality.
- Date of Arrival: This must match the date you land in Manila.
Step 2: Accommodation and Contact Information
Provide the address where you will stay for your first few nights in the Philippines. This could be a hotel, a friend’s house, or a rental property. You also need a functioning email address to receive your confirmation.
Step 3: Health and Customs Declaration
You will answer standard questions regarding your health status and any travel history in the past 30 days. Be honest and accurate.
Step 4: Submission and QR Code Generation
Once submitted, the system will process your data. If successful, you will receive a confirmation page containing your unique E-Arrival QR Code.
- Crucial Action: Take a screenshot of the QR code and the accompanying confirmation page. Do not rely on the airport Wi-Fi to load it. Save it to your phone’s photo gallery or print a paper copy. This QR code is your express ticket through the NAIA health screening area.
3. Physical Documents: The NAIA Immigration Checklist
Although the electronic preparation is essential, Philippine immigration at NAIA (Terminals 1, 2, or 3) is a two-step process that also demands several physical documents prepared for inspection. Keep these sorted in a travel document pouch.
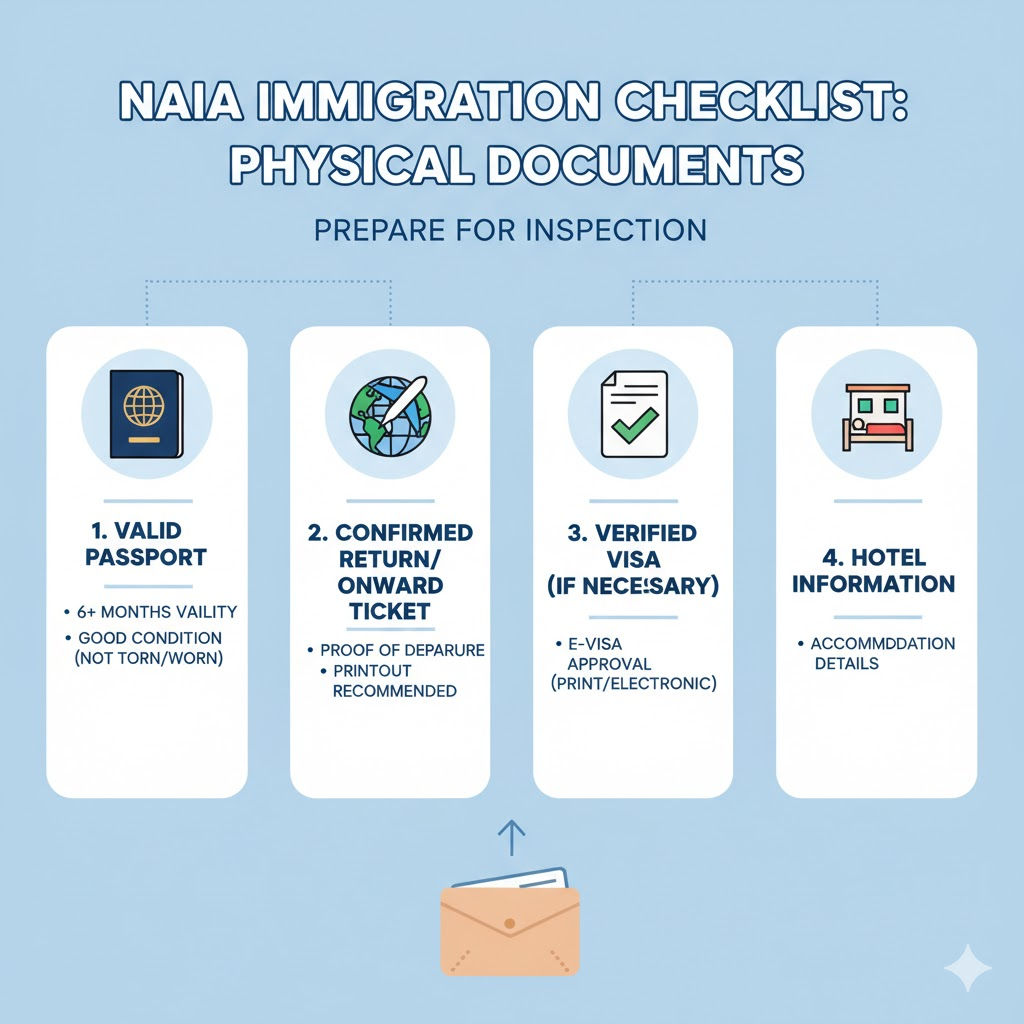
1. Valid Passport
- Validity: It must be valid for a minimum of six (6) months from your planned date of stay in the Philippines. This is non-negotiable.
- Condition: Passport should be in good condition, i.e., not torn or excessively worn.
2. Confirmed Return or Onward Ticket
- Immigration authorities require assurance that you plan to depart the Philippines.
- You should present a flight ticket proving your return to your home country or a third country within your permitted stay period (e.g., within 30 days for visa-exempt visitors).
- E-copies on your phone are usually accepted, but having a printout is an insurance against technological problems.
3. Verified Visa (If Necessary)
If you are a national who must obtain the official e-Visa, you should have the printed or electronic version of your confirmed e-Visa approval handy to accompany your passport.
4. Hotel Information
Even though frequently included under the E-Arrival Card, have a photocopy of your initial nights’ hotel reservation confirmation (or accommodation address of host) readily available.
4. Navigating NAIA Immigration: From Tarmac to Tourist
Your smooth transition through NAIA hinges on the efficiency of your preparation, especially terminal-side.
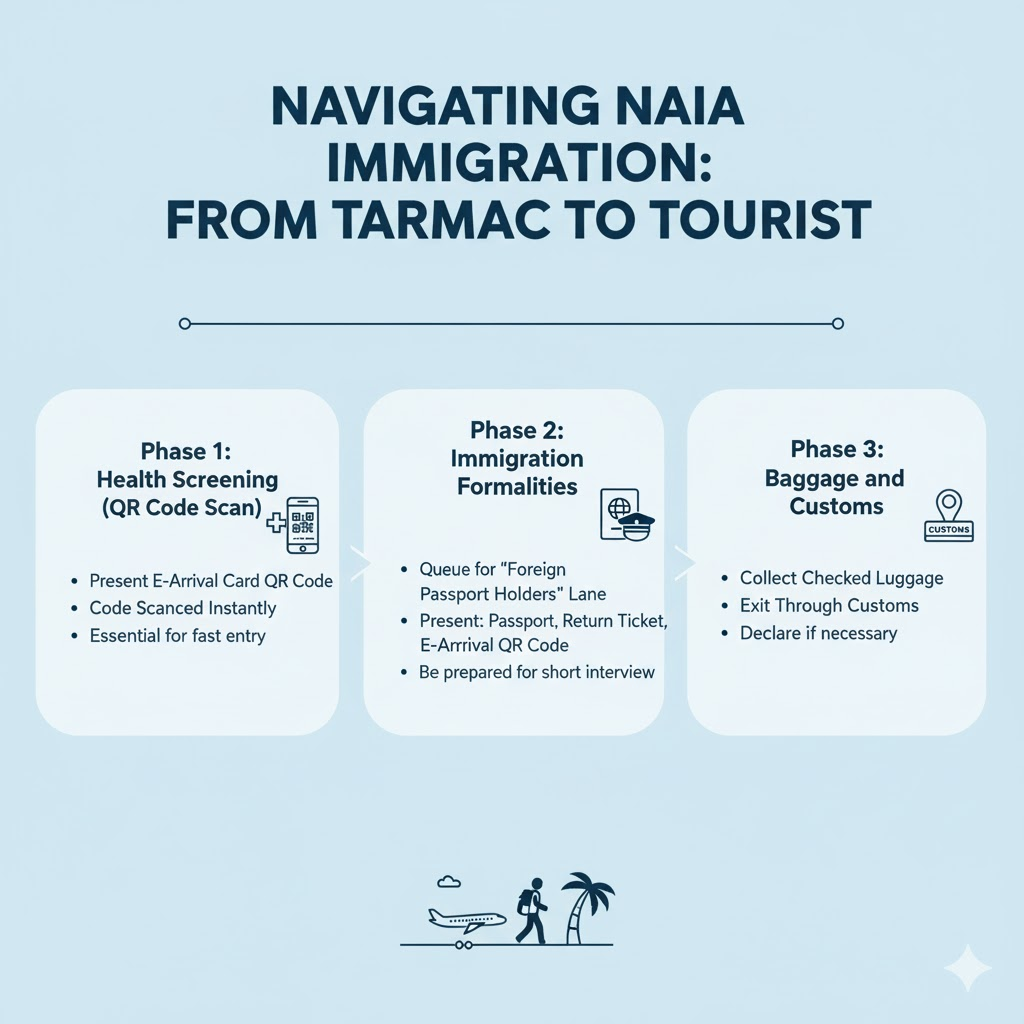
Phase 1: Health Screening (QR Code Scan)
Immediately upon disembarking and before reaching the main immigration hall, you will pass through a health screening station.
- Present your E-Arrival Card QR Code here.
- The code will be scanned instantly, verifying your digital health declaration. This step takes seconds if your QR code is ready. Travelers without the code will be directed to terminals to complete the form, causing significant delay.
Phase 2: Immigration Formalities
After health screening, proceed to the main immigration hall. NAIA is currently undergoing modernization, but expect to queue during peak hours.
- Foreign Passport Holders: Look for the designated lane for Foreign Passport Holders. Visa-exempt travelers and those with the formal e-Visa use this same lane.
- The Interview: Be ready to present all your mandatory documents (Passport, Return Ticket, and E-Arrival QR Code). The officer may ask standard questions: What is the purpose of your visit? Where will you stay? When are you leaving? Answer clearly, politely, and concisely.
Phase 3: Baggage and Customs
Once cleared by immigration, proceed to collect your luggage and exit through customs. If you have nothing to declare, you can proceed through the “Green Lane.” The E-Arrival Card often covers customs declaration questions, further streamlining this final stage.
5. Troubleshooting and Key Entry Tips
Delays at NAIA are almost always caused by a few preventable errors.
Common Pitfall How to Prevent It at NAIA Missing the 72-Hour Window Do not complete the E-Arrival Card more than 72 hours before arrival, or the system will reject it. Complete it 24-48 hours before departure. No Proof of Exit Arriving without a confirmed flight out of the Philippines. Inaccurate Hotel Info Entering an incomplete or non-existent address on the E-Arrival Card. QR Code Unavailability Relying on the internet to pull up the QR code upon landing. Expired Passport Passport validity is less than six months from the date of arrival. By treating the E-Arrival Card as a mandatory step—your digital gateway to the country—and preparing your physical documentation diligently, your arrival at Manila International Airport (NAIA) will be smooth, efficient, and quick, allowing you to start enjoying the warmth of the Philippines immediately.


